

Step 1: Begin Your Customization by Logging In
- Go to the Dashboard Login Page: Open your web browser and navigate to the astrology dashboard login page.
- Enter Your Credentials: Provide your registered email ID and password in the respective fields. (Use the "Forgot Password" link if you need help recovering your password.)
- Sign In to Your Dashboard: Click the "Sign In" button to gain access to your account.
- New User? Sign Up Here: If you're new, click on the "Sign Up" button and start your 7-Day Free Trial.

Step 2: Navigate to the Dashboard
After logging in, you will be directed to the main dashboard. Here, you can access multiple features like subscriptions, billing, API keys, and widgets.
- Locate the Widgets option in the left-hand menu.
- Click on it to view and manage your Core Numbers.

Step 3: Select the Desired Widget
In the widget section, you’ll find a list of available widgets, such as Horoscope, Numeroscope, and Tarot widgets. Select Core Numbers to proceed.
Widget > Numerology > Core Numbers

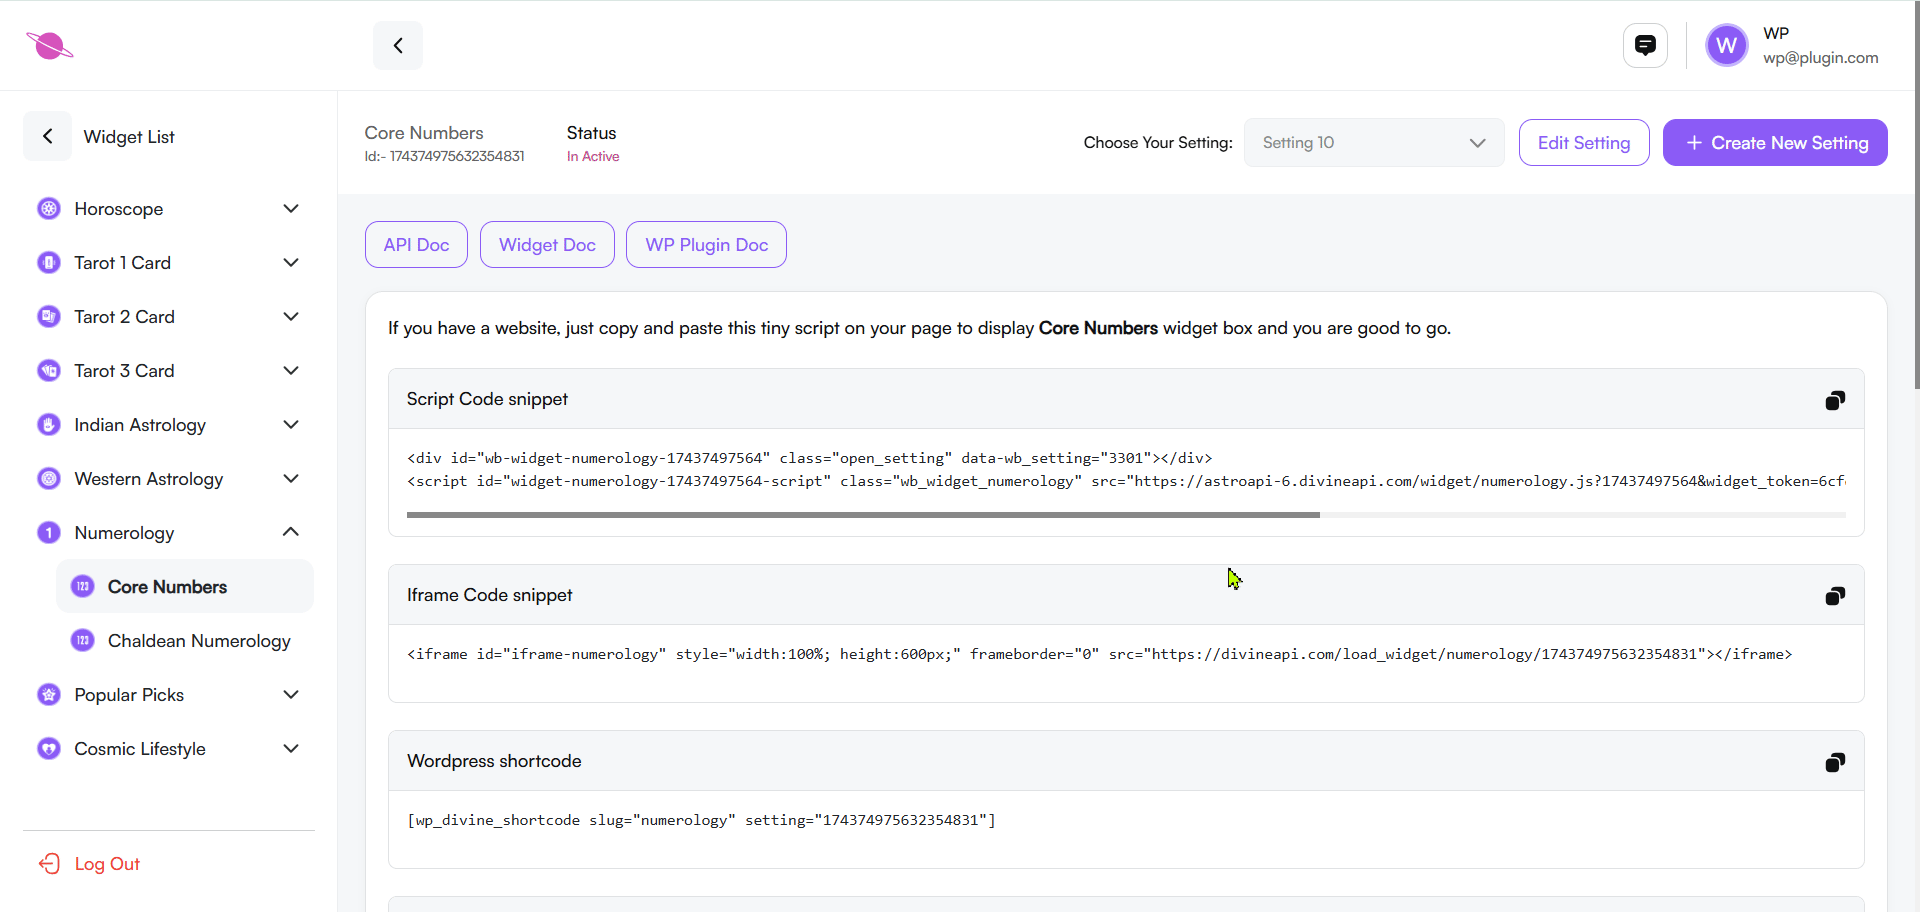
Step 4: Personalize and Embed Your Widget
Open the Panel:
- Select the Core Numbers widget to open the customization panel with integration options.
Choose an Integration Method:
- Option 1: Script Code Snippet: Copy and paste this code directly into your HTML.
- Option 2: Iframe Code Snippet: Use iframe code for embedding, compatible across platforms.
- Option 3: WordPress Shortcode: Add this shortcode to your WordPress page or post.
- Note: Install and activate the required WordPress plugin for shortcode functionality.
Copy the Code:
Click the copy icon beside the chosen option and add it to your website.

Step 5: Preview Core Numbers Content
The Core Numbers tool allows users to discover their daily insights based on key numbers in their lives, such as their Life Path Number, Destiny Number, and others. This tool provides personalized guidance by analyzing their birth date and offering detailed readings on personality, strengths, and future opportunities.
This preview ensures the tool fits your website’s design and engages your audience effectively.
Step 6: Configuring the Widget
Customize the tool’s appearance and functionality to align with your page design and user preferences. Follow these steps:
1. Create a New Setting:
- Click the “+ Create New Setting” button located at the top-right corner of the settings page.
- Name your setting descriptively, such as “Core Numbers - Custom .”
- Personalize the tool by customizing elements like color schemes, font styles, and layout to align with your website’s appearance.
Editing an Existing Setting
- Use the “Choose Your Setting” dropdown menu to locate and select the setting you want to modify.
- Click the “Edit Setting” button to access the customization interface.
- For more information on managing multiple widget settings, refer to this detailed guide.

2. Change the Setting Name:
- Locate the Setting Name field in the settings panel.
- Enter your desired name to label this configuration.

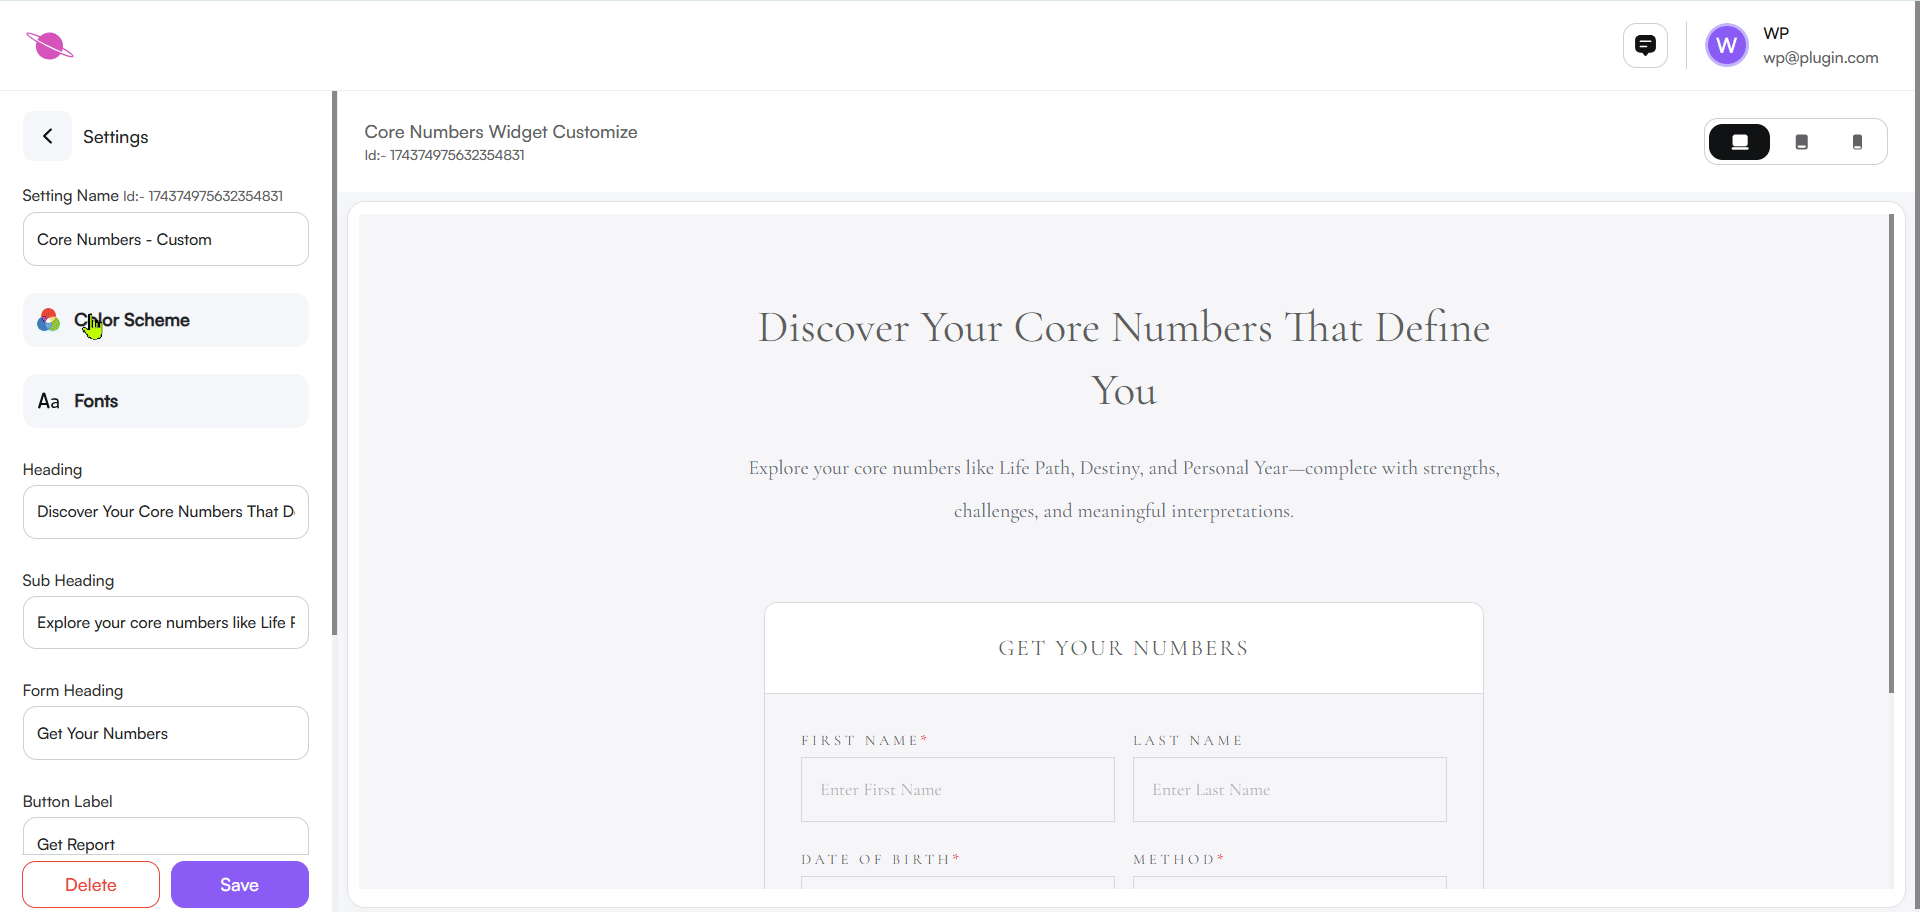
3. Update the Color Scheme
- Access Color Settings: Open the Color Scheme menu in the customization panel.
- Explore Pre-set Themes: Choose from options like Light, Light Accent, Accent, Dark, and Dark Accent tones to align with your desired aesthetic—minimalistic, bold, or professional.
- Customize the Palette: Modify the pre-set theme by refining individual color tones for a unique look.
- Edit Specific Colors: Click the Edit (Pencil Icon) to adjust:
- Primary Colors: Used for Background, Titles, Text, and Lines.
- Secondary Colors: Applied to complementary sections like Background and Text.
4. Adjust the Fonts:
- Navigate to the Font Settings: Head to the "Fonts" menu in the settings panel to explore customization options.
- Choose a Font that Fits: Browse through the list of fonts and select one that matches your tool’s style and user preferences.
- Instantly Apply Changes: View the updated font directly in the tool preview, making it easy to see how it fits your design.
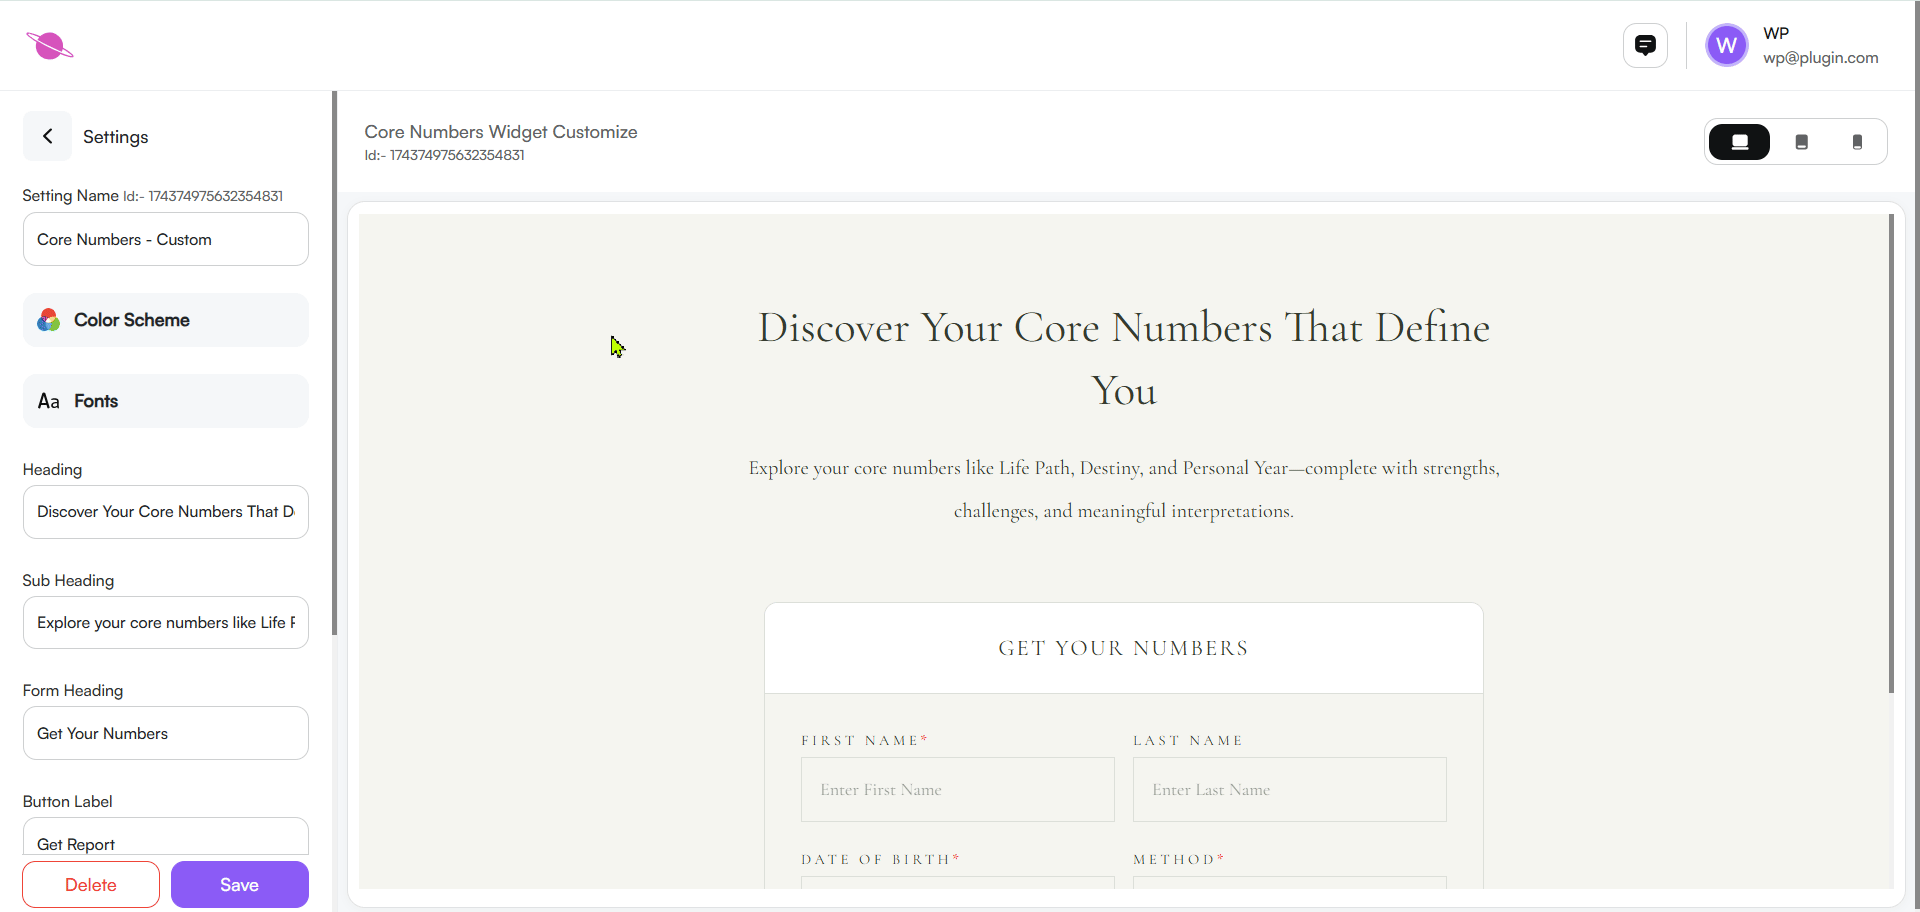
Step 5: Widget Settings Configuration
Customize the widget’s heading, subheading, form, and input fields to align with your website’s style and user experience.
Heading & Subheading:
- Heading: Enter your desired title in the Heading field (e.g., "Discover Your Core Numbers That Define You").
- Subheading: Add a brief description in the Subheading field (e.g., "Explore your core numbers like Life Path, Destiny, and Personal Year")
Note: You can personalize these texts to suit your needs. Changes will reflect instantly in the widget preview.

Form Heading:
Customize the heading for the input section to guide users in providing necessary details for the Core Numbers calculation.
Example: "Get Your Core Numbers"
Button Label:
Customize the button label to encourage users to submit their details and get their numerology report.
Example: "Get Report Now"

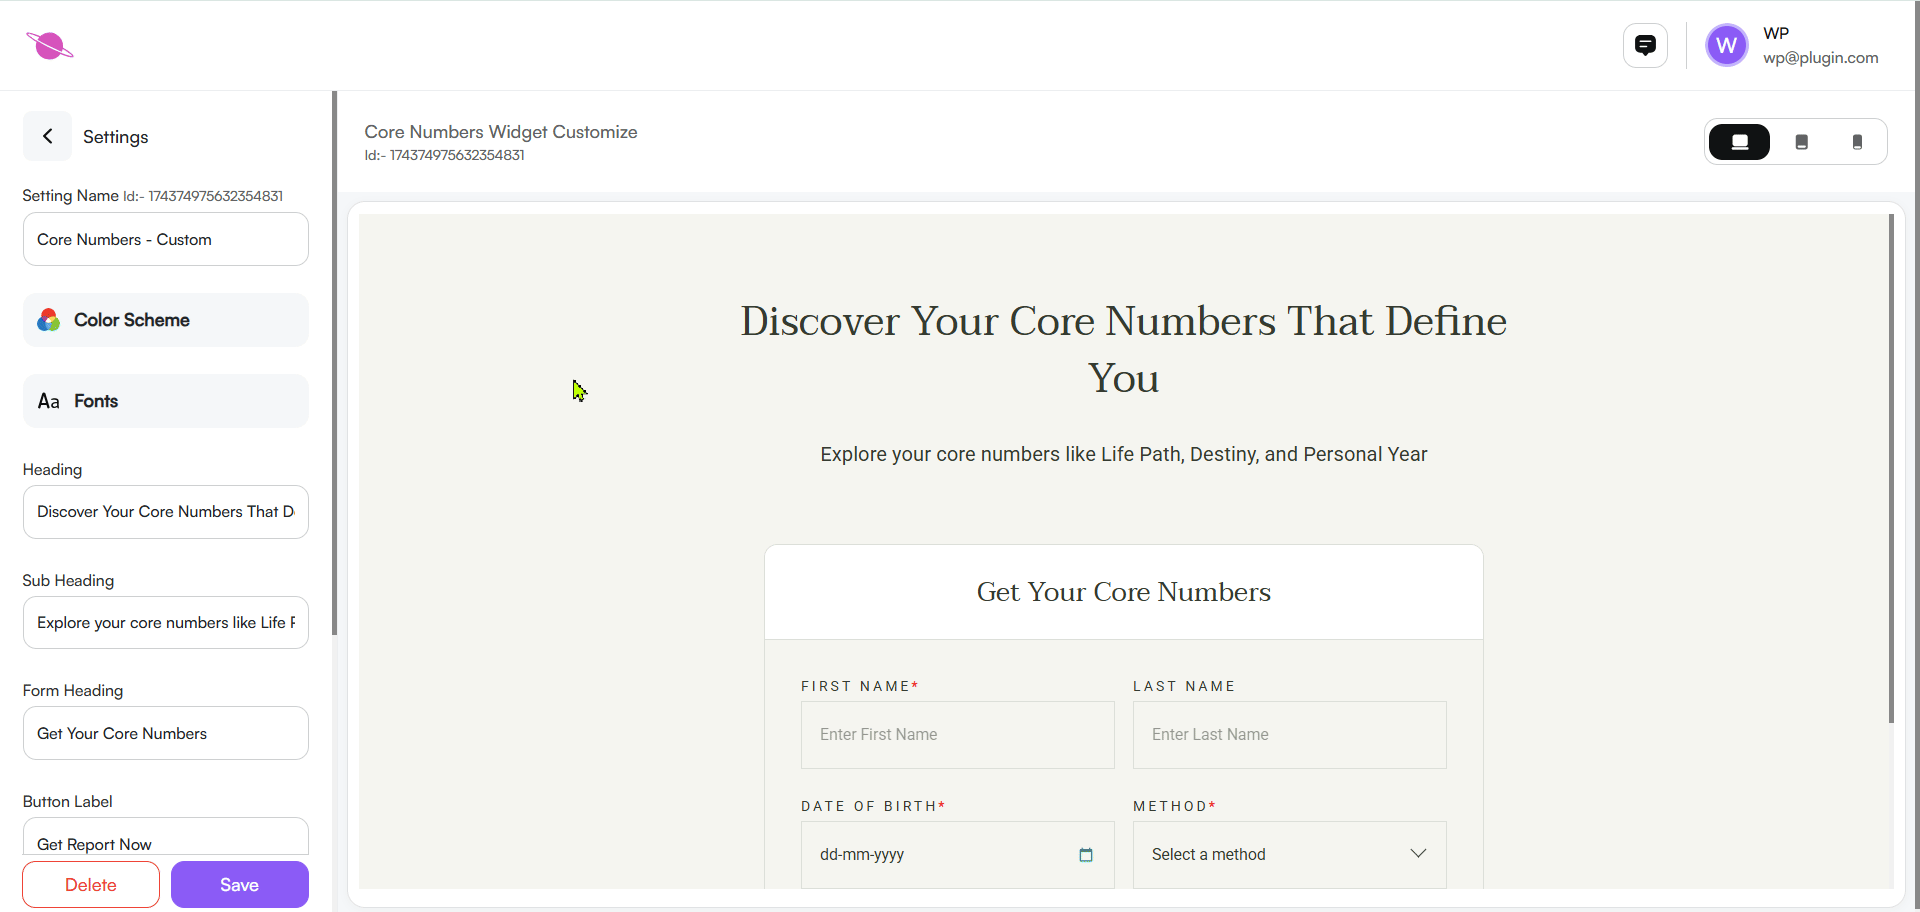
Input Fields Configuration:
Modify input fields to collect user details for accurate Core Numbers calculations.
- First Name: Allows users to enter their first name.
- Last Name: Captures the user's last name.
- Date of Birth: Essential for calculating Life Path and Destiny Numbers.
- Method: Users can select or input a method for number analysis (e.g., Pythagorean or Chaldean).

Customization Options for Input Fields:
- Click the Edit (Pencil Icon) beside any input field to modify its label or field type.

Step 7: Use the Preview Functionality
To ensure your Core Numbers tool looks perfect across all devices, use the Preview Functionality located in the top-right corner of the customization screen. This feature allows you to switch between different device views:
- Desktop View: See how the tool appears on a large screen.
- Tablet View: Preview how it will display on medium-sized devices like tablets.
- Mobile View: Check the responsiveness and layout on mobile screens.
Toggle between these views to ensure the design, fonts, and content remain consistent across all devices. This step helps you deliver a seamless user experience for all your visitors.

Step 8: Save and Embed the Widget
Save Your Customizations:
- Click the Save button at the bottom of the customization panel to lock in your changes.
- Navigate to Widget Home: Use the Back button at the top to return to the widget overview page.
- Preview and Confirm Updates: Double-check the preview section to ensure all changes are visible and accurate.
- Copy the Integration Code: Grab the provided code snippet and paste it into the HTML of your website.
- Test for Accuracy: Check the tool on your site to verify it functions smoothly and matches your design.
Conclusion
The Core Numbers tool offers personalized insights into your life based on your birth details. By providing key readings such as your Life Path Number, Destiny Number, and Personality Number, users can gain a deeper understanding of their personality, strengths, and life purpose. This tool helps guide users in making informed decisions and gaining clarity on their life's journey.